Showing posts with label double layouts. Show all posts

Thursday, October 31, 2013

Spooktacular Day | Halloween double layout

          Boo to you!  Happy Halloween everyone - hope that you all enjoyed the holiday.  We had a fun couple of events to participate in for Halloween and I look forward to scrapbooking them soon...  In the meantime, I have finally gotten around to finishing my Halloween layout that I started at our HKMC Fall Retreat using last year's pictures!!!  Take a look at the SPOOKtacular Day.
          The Luminarte Silk Paints are one of my new favorite items - and this Pumpkin Spice was the PERFECT orange color for my Halloween layout (Figure 1).  Check out the title - it started out as raw chipboard, but with one coat of this beautiful silk paint... gorgeous!  I used that same paint on my tag that I layered under the Trick or Treat canvas tag that I found in my stash.  In addition, I added my journaling on white cardstock that I decorated with washi tape down the side to give it a little pizzazz.  Then I tied a small bit of black & white twine around the tag to complete this section.

Figure 1

           One final touch that I added once my layout was complete were these two googly eyes to the center of the Os in SPOOK (Figure 2).  TOO FUN!

Figure 2

          My collection of pictures were from three different events around Halloween 2012: 1) creating the haunted house, the pumpkin carving, and the shrunken apple heads; 2) the magician act at our apartment complex and how he kept picking on my two girls and their wigs!; 3) the Halloween party we attended at one of our friends' homes.  I blocked the pictures in the middle of my accents to help unify the different events.  I added one of my Reminisce papers with the green background and adorable spiders down the side of my right page...  I liked the look of the spiders but I only wanted it as an accent - and to make them even cuter - my friend, Jen, suggested I added some glossy accent to each of them!  She was right!!!   I used my exacto knife around a few of the swirls to give the page an added dimension (Figure 3).  All in all it turned out fairly well - what a fun group of memories to collect. 

Figure 3

Friday, September 20, 2013

HKMC | September Kit Club

          The HKMC September Kit Club had some beautiful papers from the Bo Bunny Key Lime collection.  I love the navy and lime colors with a dash of yellow.  From this kit, I created three layouts: 2 double-page layouts and 1 single-page layout (shocker I know!). 

          The first layout I created was a 2-page spread that began with the two Deep Blue Sea papers.   I rotated the right paper counter-clockwise in order to use the rays across the 2 papers.  From my tool stash, I pulled a vintage Bo Bunny flexible ruler out and used it across the 2 Sun-Dew papers to create a wavy sand look. 

          I printed my marshland photo as an 8R and tucked it under the Sun-Dew paper.  I used the white Thickers letters to spell out my title, along with some Heidi Swapp letters for the subtitle.  I love the mustard Color Shine - so I sprayed it on the small Heidi Swapp letters.  With instagram type frames self-cut for three photos, plus a 4R beach photo & a cute orange polka-dot cellophane pocket to hold my journaling and extra photos...   

The last touches were the Heidi Swapp No Limits banner (from my stash), and the Color Magic notes to cover the fish in the upper right corner. 


          My second layout was inspired by Ali Edwards Hello Story class.  Ali had suggested using a circle pie chart in a layout, but I thought a heart pie chart might be a fun alternative.  After cutting a circle from the left over Sun-Dew paper, I used red acrylic paint in the shape of a heart behind the pie pieces.  I used several photos taken over a year to show my son's relationship with a bunch of the females in his life!!!    Finally, I colored six Color Magic notes and "attached" each one to a photo - underneath is my journaling about each event.


          Finally, my last layout with the Bo Bunny Key Lime collection, was created with one inch strips of our collection of papers.  I wove them together to create some texture and then used gesso and water over it to soften the bright colors a bit.  I LOVE IT!  It is definitely out of my comfort zone - a single page AND a single picture - whoa!!!  Those of you that know me best know just how far this is out of my norm...  I think I'm going to have to do this more often :)

 
          I spritzed the mustard Color Shine over a stencil on my paper to create my on background - stamped some vintage photo Distress ink with a few different stamps - and even used the bottom of my coffee cup to make some circles!!  Next, I used my diamond stencil with some modeling paste to create texture. 
          The MUSIC letters were sprayed with Mustard Color Shine on top and Cherry Color Shine on bottom.  Once I wiped the letters it blended so nicely with a slight orange color in the middle!  The white and red flower was made from a piece of paper towel that I used to soak up some of the beautiful Heidi Swapp Cherry Color Shine that I sprayed on the letters.  I twisted the paper towel and glued it into a circle.  By using a Sissix 3D flower diecut, I created the yellow/white flowers from the paper towel that I used to soak up the mustard color!  In addition, I added in several flowers from my stash to complete the grouping.  Last I added a couple of birds singing...  my favorite layout!

          Hope to hear from you all about your latest layouts!

Monday, September 9, 2013

Hello Story | Life by the Numbers

          Welcome back!  I am excited to show you a double-page layout that I created called "Life by the Numbers".  I used some random photos of my four-year-old son.  Before laying out the pictures, I spritzed the gorgeous MME The Sweetest Thing - Honey yellow dot paper with some Mister Huey spray in black (check out these great techniques from Dear Lizzy for spraying).  I also love the MME honeycomb stamps - so fun!  I used the beautiful flags as a banner and a couple of different black washi tapes to balance the layout.       


I grabbed a set of black thickers from my stash to use in my title - I love that my "e" is the number three that I turned upside down!!!  I gathered several random facts:  his weight, his height, which # cousin, and 1st cookout.  I used some of the MME number paper along with the black number washi tape, and number stamps to capture my sons life in numbers. 

Friday, July 5, 2013

Welcome to Bella Mix!

It’s been ages since I posted – however I am excited to share some of the things that I’ve been busy working on!!!  First - a new blog look.  How exciting to always be in the process of learning - and blogging is no exception.  I would love feedback on how it looks!  When Jessica offered a class "Bloom Your Blog" - I jumped at the chance to learn more and add to my skills... 
Next, in January, I began a new adventure: Digital Project Life.  I love the digital information available over at Jessica Sprague’s website www.jessicasprague.com.  There are new classes offered each month on everything from Photoshop, photography, or digital scrapbooking, along with some fantastic digital scrapbook collections. 
I love how project life captures the everyday life.  Sometimes those small things add up to a BIG life, but may get lost along the way in memory keeping.  And the digital element makes it something easy for me to duplicate for grandparents or for all three children when they are older. 

Check out how January turned out:
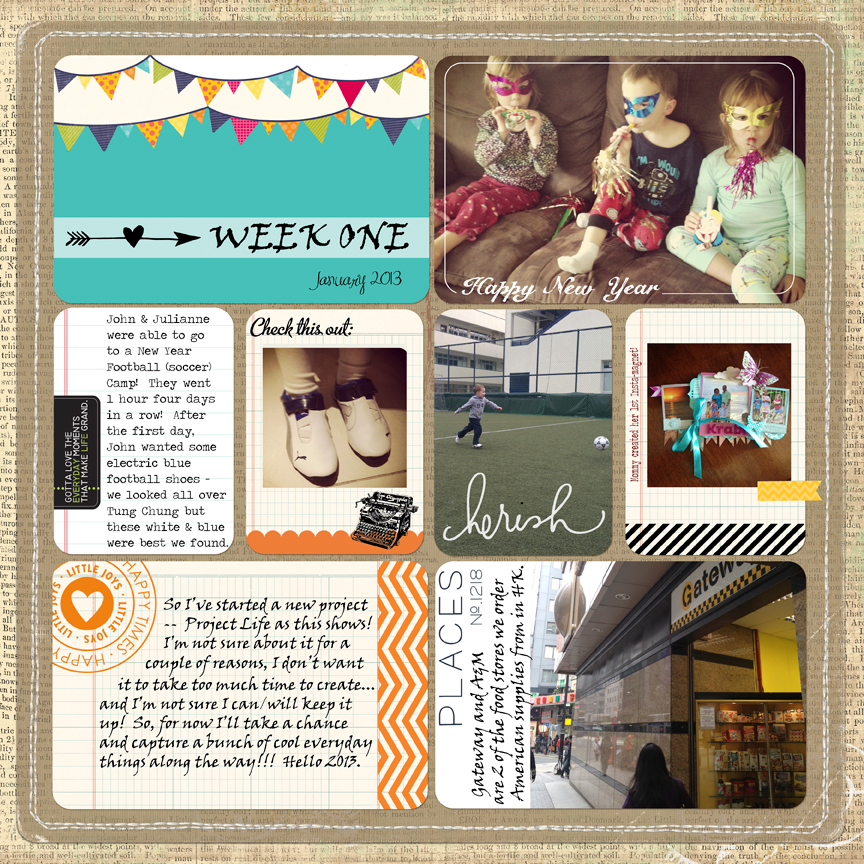
 
January Week One
 
 
I love, love, love mixing the photos, graphic cards and text - so fun!!!  I'll show a close up of each page so you can check out the journaling also...  
 
January Week One left side


 What a fun memory of our first week in 2013!  John and Juli started a new football (aka soccer) team.  Annabelle is so sweet to read to the little ones sometimes - she's becoming quite the little lady.  How fun is the chevrons and arrows??  LOVE IT!  And below on the right side, I've captured a sweet photo of the two girls, added an awesome transparent 'rub-on', and ta-da!


January Week One right side
 
I choose to keep the first block the same for the whole month for consistency.  The second week looks like this:
January Week Two
 
 
Take a closer look at what I captured this week...  Johnny and I are trying some new healthy recipes...  brand new swim classes began for John and Juli...  plus the everyday things like school and playing with Rosie our golden retriever. 

January Week Two left side
 
 
Sometimes with the iphone photos, either the quality or the size cannot be used by itself in the larger 4x6 sections...  so what I used for my bottom right card above is a diagonal striped paper + my photo - to create a unique card...  The diagonals give a dynamic action feel that seems to work well with the action shot.
 

January Week Two right side
 

Now, take a look at the 3rd week of January.  I've continued with the same first digital card for consistency. 
January Week Three
 
I love that I can use digital papers and elements in new ways - and find a lot of free digital project life cards on Pinterest.  From there you can find links to different websites that sell additional supplies.


January Week Three left side
 
Now that I've been working on project life for a few weeks - I've begun to think more about what I want to capture and how to do just that.  Some of my photos are on my DSLR camera, but a lot of these are iphone photos!  Using my phone has given me a whole new opportunity to preserve our memories.  Two of my FAVORITE:  (1) this picture of Juli on her way to gymnastics...  I asked her to turn around and pose and I snapped a dynamic shot of her with our golf cart in the background!!! and (2) this shot of John's football, knees and trainers...  he is becoming such a tough little guy.  I'm so glad I have somewhere to capture these stories and photos. 

January Week Three right side

Hope you find some inspiration in some of these ideas - have a blessed week!

Angela